プロジェクトが変わるたびに毎回似たようなものを作っている気がしたので、メモしておくことにしました。
単純なAPIのパフォーマンスならNewRelicやらDatadogやらで見れば良いですが、アプリ内部のボトルネックの検証をするのには役に立つ事があります。
こちらは主に外部ライブラリに通信関連を委ねている場合に、汎用的に差し込む目的で利用します。
ラッパークラスを作成している場合は、URLProtocolを利用せず、そちらに直接os_signpostの処理を書いていくのがわかりやすそうです。
コード
URLProtocolの実装は以下のようになります。
実際に通信を行う必要があるので、URLSessionを利用します。
Loggerについては既にどこかで定義されていれば、それを利用してもOKです。
なければ、OSSignposter.init(subsystem:category:)で定義できます。
import Foundation
import os

final class SignpostURLProtocol: URLProtocol {
    static let logger = Logger(subsystem: "com.flyingalpaca.sample", category: "API")
    private let signposter = OSSignposter(logger: SignpostURLProtocol.logger)
    private let session: URLSession = .init(configuration: .default)
    private var sessionTask: Task<Void, any Error>?
    private var state: OSSignpostIntervalState?

    override static func canInit(with _: URLRequest) -> Bool {
        true
    }

    override static func canonicalRequest(for request: URLRequest) -> URLRequest {
        request
    }

    override func startLoading() {
        let id = signposter.makeSignpostID()
        let message = [request.httpMethod, request.url?.absoluteString]
            .compactMap { $0 }
            .joined(separator: " ")

        state = signposter.beginInterval("API Call", id: id, "\(message)")
        sessionTask = Task {
            let (_, response) = try await session.data(for: request)
            let statusCode = (response as? HTTPURLResponse)?.statusCode
            endInterval(message: statusCode.map(String.init))
        }
    }

    override func stopLoading() {
        endInterval(message: "canceled")
        sessionTask?.cancel()
    }

    private func endInterval(message: String?) {
        guard let state else { return }

        if let message {
            signposter.endInterval("API Call", state, "\(message)")
        } else {
            signposter.endInterval("API Call", state)
        }
        self.state = nil
    }
}
利用時はURLSessionConfigurationを利用します。
デバッグ時のみ処理したい場合は、この部分かcanInitに判定を追加すると良さそうです。
let configuration = URLSessionConfiguration.default
configuration.protocolClasses = [SignpostURLProtocol.self]
let session = URLSession(configuration: configuration)
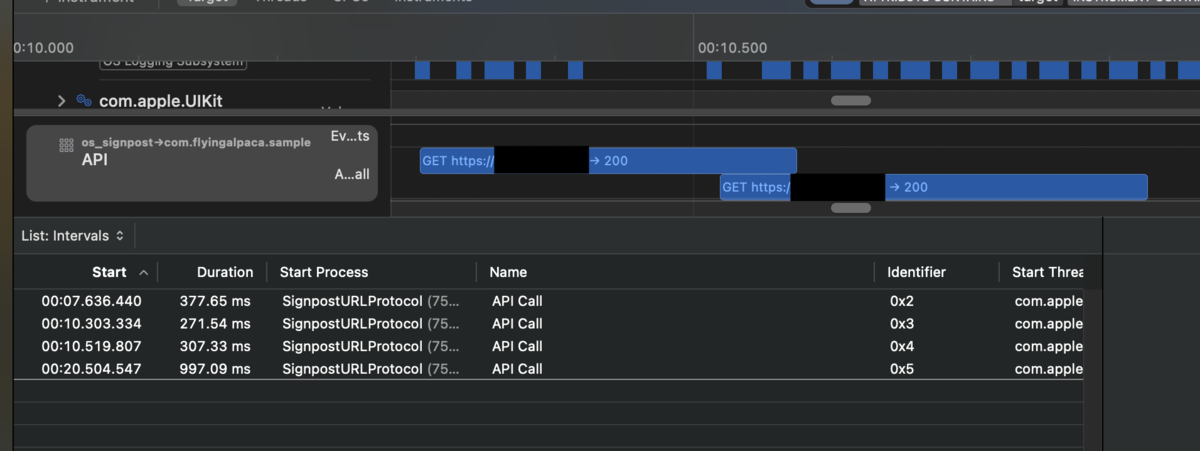
Instrumentsでの動作
このようになります。